A formlet is a component of an eForm. Each formlet corresponds to a section of the eForm, such as Department Review or Approval. ProjectDox has a standard set of built in formlets. Formlets that are standard in the Best in Class workflow cannot be edited.
The
formlets are in the Formlet Manager
Tab. This tab allows a System Admin to add and edit additional custom
formlets. The custom formlets can be identified by the presence of the
Edit Workflow Formlet icon
 , and a flag
of NO under the Is
Standard? column.
, and a flag
of NO under the Is
Standard? column.
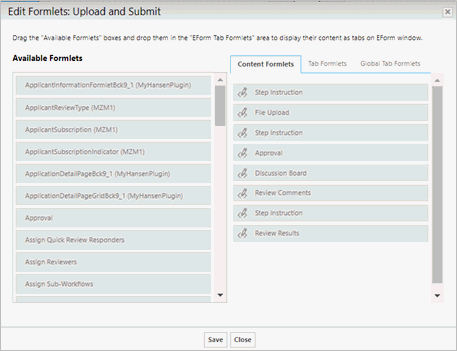
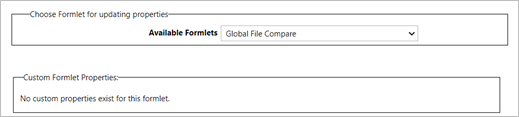
Predefined formlets can be added,
removed, or edited to a workflow activity by clicking the  icon.Drag the "Available Formlets"
boxes and drop them in the appropriate Formlet tab area to display their
content as components on the EForm window. When the
icon.Drag the "Available Formlets"
boxes and drop them in the appropriate Formlet tab area to display their
content as components on the EForm window. When the  icon
is clicked it will open the formlet properties window. This is a shortcut
to edit the formlet properties. The
properties can be changed from this page.
icon
is clicked it will open the formlet properties window. This is a shortcut
to edit the formlet properties. The
properties can be changed from this page.
 Remember to click save before you close the
formlet properties box otherwise all changes will be removed
Remember to click save before you close the
formlet properties box otherwise all changes will be removed

Below
is a list of the standard formlet's included in Avolve's ProjectFlow workflow.
Approval –
A formlet typically used for the approval of documents from the applicant. Title:
Title that is given to the formlet
section. Require
Checkbox\Radio Button Input:
Determines
if the checkbox\radio button is enabled/disabled based on whether the
checkboxes are checked or not. Option
Types: Specify type of input controls which will appear on
the formlet. Options:
Specifies
the confirmation checkboxes to display in the task that will serve as
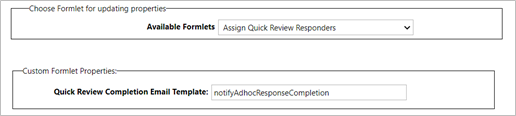
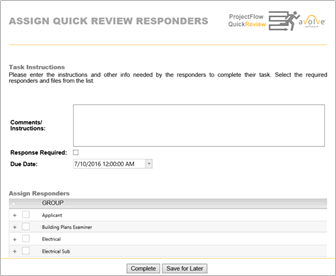
confirmation before the Complete button will be enabled. Assign Quick Review
Responders
– A formlet used to assign a task to
a group or individual in the Quick Review process. This formlet allows
the user to require responses to comments, add files directly to the eForm
and select a due date. Quick
Review Completion Email Template:
Specifies
the email template used when the quick review summary is sent to the selected
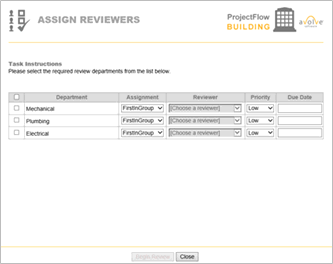
users. Assign Reviewers
– A formlet used to assign individuals
in various departments to review the applicant’s submission. Start
Sub-Workflow –
Allows assigning sub-workflows
at the beginning of the Dynamic Review workflow. These buttons allow the user to
start or restart individual sub-workflows. These buttons will be hidden
if the sub-workflow has an active activity. If the sub-workflow was never
started, the button will display “Start Sub-Workflow”. If the sub-workflow
has been started in the past and can be started again, the button will
display “Restart Sub-Workflow”. Only when the activities within the sub-workflows
are completed will the sub-workflow be able to be restarted. The Assign Sub-Workflows formlet can be added to
the Generic Activity to allow users to start sub-workflows. This formlet contains a list of all the sub-workflows
configured in the workflow instance. There is a checkbox to the left of
each sub-workflow. Each sub-workflow corresponds to an Activity Grouping
(sub-workflow) on the workflow design. If the checkbox is checked, the
sub-workflow will be started when the user clicks the complete button
and finishes this eForm task. The startup group for this task will be the users
who can start the sub-workflows. The user can start one or more of the
sub-workflows and then use the Monitor Sub-Workflow Dashboard to start
or restart others later. Typically, there is only one startup task for
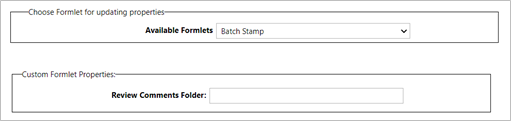
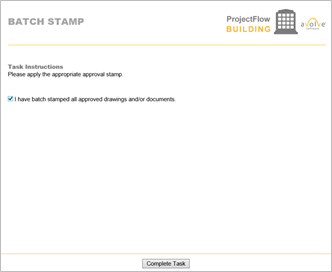
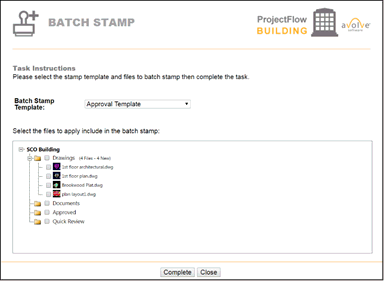
this activity. Batch Stamp
– This
formlet is used to confirm that the user responsible has performed the
approval batch stamp. Once this is confirmed, the applicant receives an
email which lets them know their final set of plans are now ready for
download. This formlet is used for manual batch stamping. Review Comment
Folder: Specify a valid destination
folder path to the checklist report. The format is the following for single
level folder or multiple level: Approved Approved/Checklist If the folder is specified, a
“Generate Review Comment Report” button will be visible in the eForm,
otherwise the button is not shown on the eForm. The Simple
Batch Stamp activity is configured using a Generic Activity with a
Batch Stamp formlet. This activity is a simple way to manually verify
the batch stamp process was completed using the ProjectDox Batch Stamp
screen. Batch File Stamp Template: This drop down is a list of all the batch
stamp templates configured in the Admin section of ProjectDox. Select
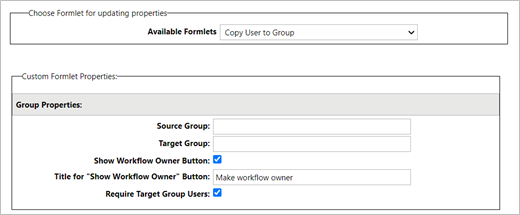
the files to apply the batch stamp: Copy User to Group –
This formlet is used to add a user from one group to another, all within
the eForm itself. In order for a particular user to show up as an available
choice, they must be a member of the selected source group (the group
you have selected for options during configuration). Once this activity
is completed, the chosen user will be added to the target group (the group
selected during configuration as the one which users are being added to
during.) Source Group: Specifies the
source group that will contain the user from which to add the target group. Target Group: Specifies the
target group that the user will be added to. Show Workflow Owner Button:
Determines if button “Show Workflow Owner” should be shown. Title for “Show Workflow Owner” Button:
Specify a title for “Show Workflow Owner” button. Require
Target Group Users:
Determines
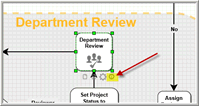
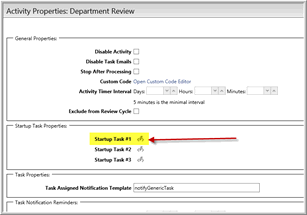
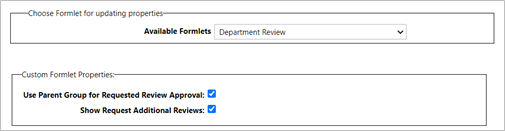
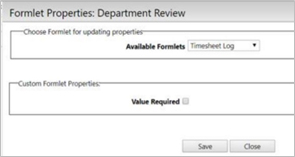
if target group should contain at least one user. Department Review
–
Startup Tasks are now exposed
in the Department Review activity properties. In previous versions, they
were hidden and not used because reviews were always assigned using the
Assign Reviewers activity. In ProjectFlow v2.0 and higher, the Department
Review activity can opt out of using the Assign Reviewers activity and
choose to assign the reviews ahead of time using startup tasks. When the Department Review activity is initialized,
the system will first check to see if there are startup tasks configured,
if so, it will assign the reviews and assign the tasks for those reviews
at that time, if no startup tasks are used, the assumption is that the
Assign Reviewers activity is being used to assign reviews in a previous
step or reviews are being assigned programmatically using custom formlets
or custom code. Use Parent Group for Requested Review Approval:
Determines if the parent group is the one notified for requested reviews
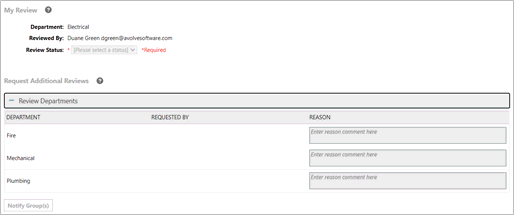
or the Review/Planning Coordinator is used. Show Request Additional Reviews:Determines
if the “Request Additional Reviews” section should be shown. The Request Additional Reviews section of
the Department Review EForm will be hidden if: The “Show Request Additional Reviews” formlet
property of the Department Review formlet is unchecked. This is checked
by default. If there are no other reviews available
to assign. If the current user opening the EForm is
in the root level group of the review configuration. If
the Department Review is not contained inside of an activity grouping
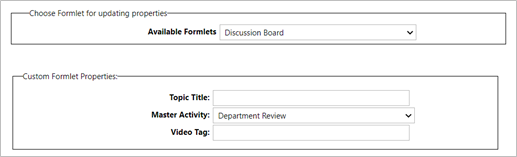
with a review configuration set on it. Discussion
Board –
A formlet used as a communication tool between participants in the workflow.
The comments will be viewable directly on the eForm. Topic
Title:
The title of the topic and displays
the header above the Discussion Board formlet. The Topic Title placed
on any child activity will only show as the header above the Discussion
Board formlet. The title of the topic for the child activity will always
be the Topic Title defined on the master activity. Master
Activity:
The master
activity that links all the activities in the discussion together. Video Tag: Specifies
tag to load help content. The
Discussion Board topic has three properties: Topic: Category: Description: A description
can be added for the discussion topic but is not required. File
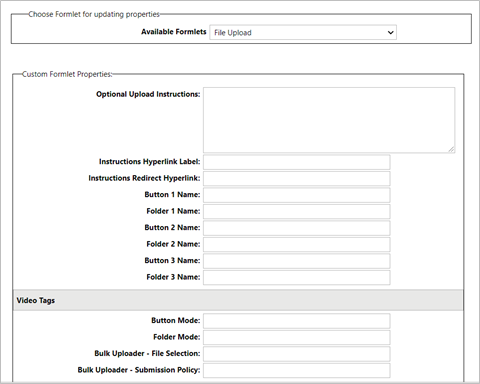
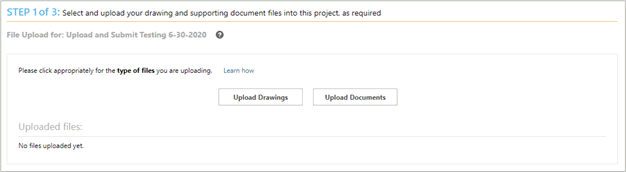
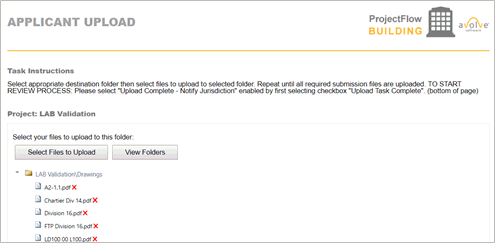
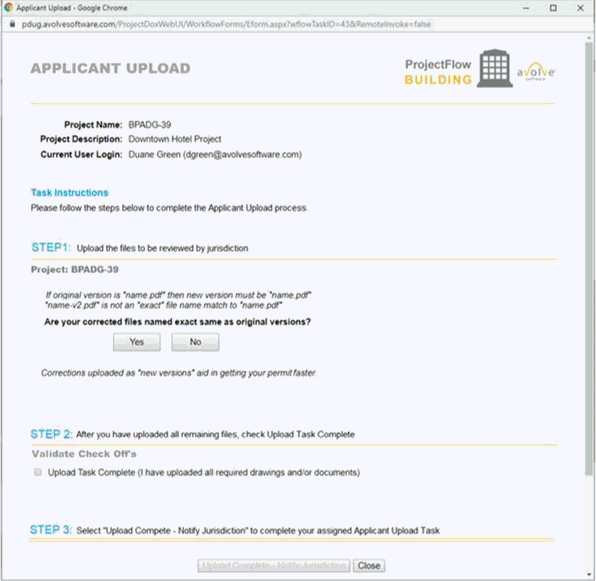
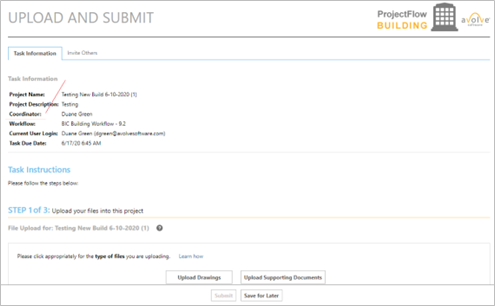
Upload -
The File Upload screen allows Applicants to upload their electronic plans
and other documents during the workflow process using the ProjectFlow
eForms. This is deployed on any new BIC workflows definitions; legacy
workflows will continue to use the File Upload activity without the file
upload formlet. If the customer requests existing workflows to be retrofitted
with the “File Upload” formlet it can be added manually in the workflow
designer with a services engagement. If manually added, then it will only
affect new workflow instances created after the change. File Upload
allows for Optional Applicant Instructions and hyperlink to redirect the
applicant to additional information a jurisdiction may wish an applicant
to review prior to uploading their drawings. They can add not only additional
instructions, but they can also add a hyperlink to redirect an applicant
to additional information on their website, etc. The hyperlink is optional,
the user can just add instructions or instructions and hyperlink Optional Upload
Instructions:
Enter
the upload instructions for the
file upload formlet. Instructions
Hyperlink Label:
Text that can be configured as a hyperlink and displayed on the eForm. Instructions Redirect Hyperlink:
Hyperlink to a short tutorial
video to be played for the applicant on how to upload files. Button Name: Text
that will display on an upload button. Folder Name: Folder mapped
to a specific project file folder. This map is for a main or parent folder.
Sub-folders are not supported. The
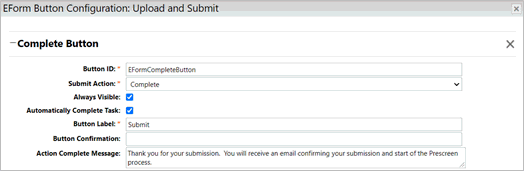
Complete Button text can be customized in the Eform Button Configuration
screen in the fields shown below. The
Action Complete Message is optional. It is a way to communicate to the
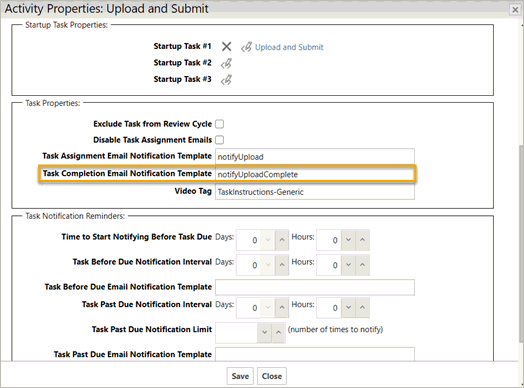
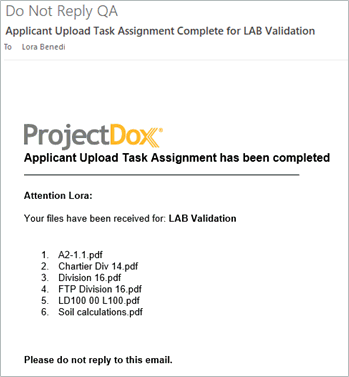
user that the action is complete and the files have been uploaded. Activity Properties for upload, Task Completion,
Email Notification Template specifies the notifyUploadComplete email template.
This email can be customized as all other emails in ProjectFlow. When the form launches, the permissions will
determine what folders the applicant will see in this formlet. When the user clicks on the folder of choice,
the “Select Files to Upload” and “View Folders” button are displayed.
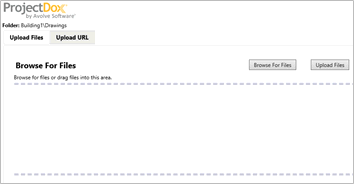
Select Files to Upload Clicking
this button will open the ProjectDox Upload screen allowing the user to
upload any number of files. If the user has the permission, the user
can also delete files from the folder by clicking on the X icon beside
the file. View
Folders Clicking this button will display the main folders view allowing
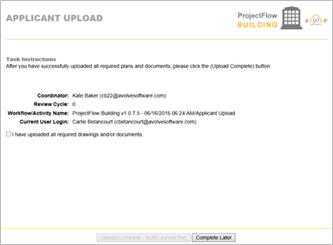
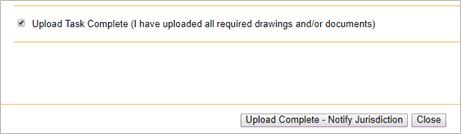
the user to choose another folder to upload to. Once the Applicant checks the checkbox “I
have uploaded all required drawings and documents.” then clicks the Upload
Complete button, they will receive a confirmation email if configured
to do so. Troubleshooting Confirm
Uploading is operational from the user interface. Confirm
notifyUploadComplete.html is in the Custom\en folder of the ProjectDox
install. Confirm
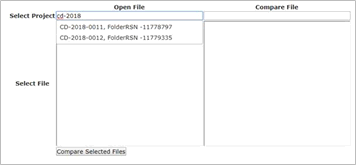
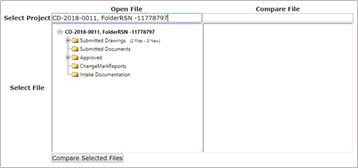
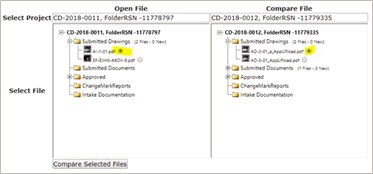
user has permissions to desired folders. Global File Compare
–
This formlet enables the comparing of files across folders and projects. 1. In
the Select Project field under “Open File”, start typing the project name.
The search will start auto-populating projects that match. 2. Select the desired project.
The folders will populate. 3. Do the same for the Compare
File option. 4. Open the folder(s) and
select the radio button for the files to compare and Click ‘Compare Selected
Files’. Group
Management
– This formlet is used to give the user
the ability to invite or remove users from their group. Invite to Group: Specify
a pipe (i.e. symbol) delimited list of valid Group Names to invite users
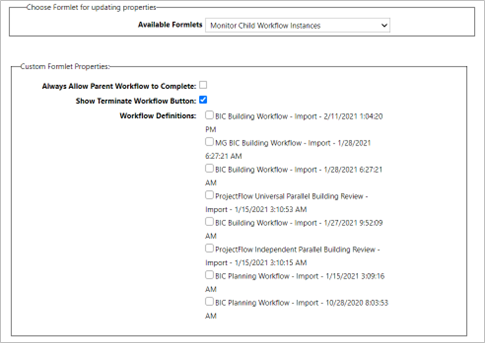
to. Monitor Child Workflow
Instances - This formlet allow for a
view of sub-workflows of a specific workflow definition. This will give
the name and status of the activity groupings within the workflow. This
is like the Monitor Sub-Workflow activity, but it will not allow the starting
of a sub-workflow. It will only give a read-only view of the instances
running inside the project and give the ability to terminate a workflow
instance. Always Allow Parent Workflow to Complete:
Specify whether to allow the
parent workflow to complete even with uncompleted child workflows or not. Show Terminate Workflow Button:
Specify whether to Show Terminate
Workflow button or not. Workflow Definition:
Specify
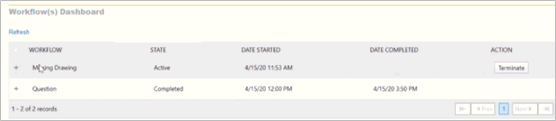
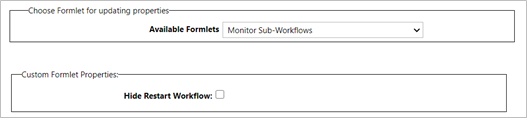
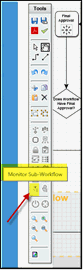
the list of workflow definitions that can be monitored from this formlet. Monitor Sub-Workflows -
A formlet for a
persistent task in a Dynamic Review workflow that allows the user/group
to see the status of all the sub-workflows and all reviews inside of the
sub-workflow. In addition, it allows for starting/restarting a sub-workflow. Hide Restart Workflow: Determines if the Restart Workflow button in
the formlet should be hidden. The Monitor
Sub-Workflow activity can be dragged and dropped on the design. The Monitor
Sub-Workflow Dashboard formlet must then be added to the activity. The Monitor Sub-Workflow activity
will use a startup group to assign this step in the workflow to a specific
group that will have the ability to monitor and manage the sub-workflow
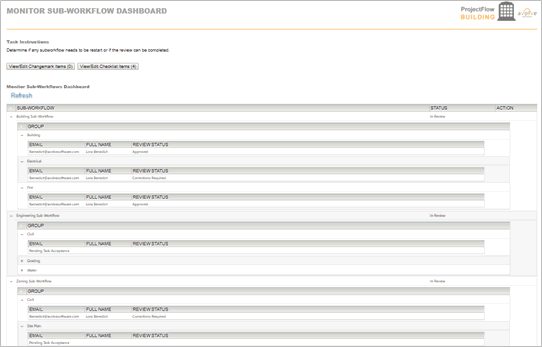
processes. These new components are used to help users in the workflow
monitor and manage the sub-workflows during the entire workflow process.
They will allow users to start new sub-workflows and monitor them in real-time.
The Refresh link will update the dashboard information currently being
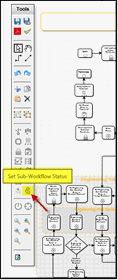
displayed for the sub-workflows. The
“Set Sub-Workflow Status” activity allows a workflow designer to add the
activity within an Activity Grouping to communicate to consumers of the
workflow what the status of the sub-workflow is at any point in the workflow
process. The activity can be dragged and dropped from the workflow designer
toolbar onto the design. The
activity does not necessarily have to be positioned inside of an activity
grouping, but for visual purposes and to help understand the process from
a visual aspect, the Best in Class Building Review designs do position
the activities inside of the sub-workflows. This helps users better understand
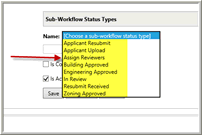
what the workflow process state is at any point. This name
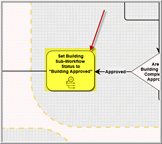
is loaded in the Sub-Workflow Name drop down are all the activity groupings
marked as sub-workflows and have the “Is Sub-Workflow” checkbox checked
[= TRUE]. The actual name in
the list is the label of the activity grouping on the design. The status
of the sub-workflow comes from the “Set Sub-Workflow Status” activities
that are configured for the sub-workflows. This
type is used to communicate the status of each sub-workflow in reports
and dashboards, such as the Monitor Sub-Workflow Dashboard. The tasks for the Monitor Sub-Workflow activity
will always be automatically completed when all the sub-workflows are
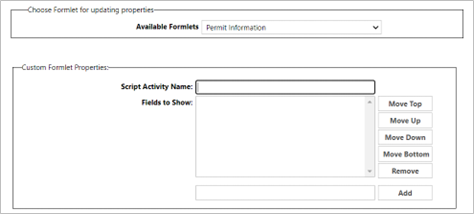
completed. Permit
Information-
The Permit Information
formlet can connect to multiple BIC Integrations so that one formlet can
be reused multiple times for multiple integrations. Project
Export
- The Export
Project activity allows the user to export selected files/folders manually
or automatically. For Manual Project Export, you need to add the “Project
Export” formlet into the activity and specify a Startup Task in the activity
property of export project activity. The formlet allows the user to select
the project Export Template and the list of files to include in the export.
Once this task is completed by the user, a scheduled task gets created
and the Task ID is placed into the “Scheduled Task ID” activity property.
The requesting user will get a notification once the scheduled task is
complete. For the Automated Project Export, you need use the
Export Project Activity and specify the following activity properties: · “Project
Export Template Name” to use in the project export, · “Export
Entire Project” which should be checked if exporting entire project · “Folder
Names” (delimited by | pipe symbol) to include in the export, if not exporting
entire project · “Notify
Group Name” which is a single valid group name to receive the notification
when the project export is completed Once the activity is executed, a scheduled task
gets created and the Task ID is placed into the “Scheduled Task ID” activity
property. The task
will be completed by the system within 5 minutes of the activity being
executed. Even though the “Scheduled Task ID” is shown on
the page, it should not be modified and it is only shown for debugging
and tracing purposes. If
an error occurs when processing the scheduled task, the workflow will
be on error state and the error log will be displayed on the workflow
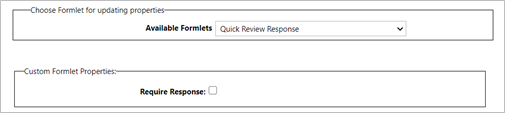
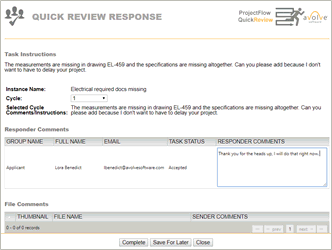
instance designer as an error log for the activity. Quick Review Response
–
A formlet which gives the individual(s) assigned a Quick Review task the
opportunity to complete the task and communicate with the initiator of
the workflow. Require Response: True
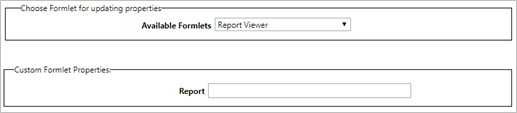
if a response is required; otherwise, false. Report Viewer
–
This formlet
allows the configuration of a single report to display in the eForm. Any
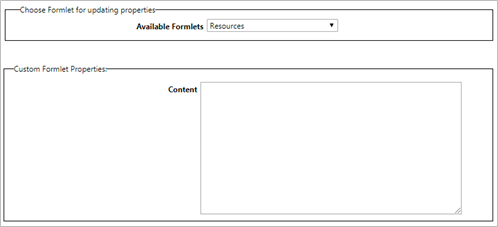
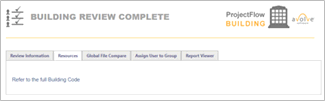
report available in ProjectDox can be used. Resources
– This formlet is used to provide
users any additional resources needed throughout the process of the workflow.
HTML can also be used. Content:
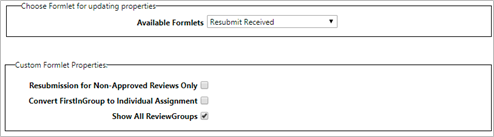
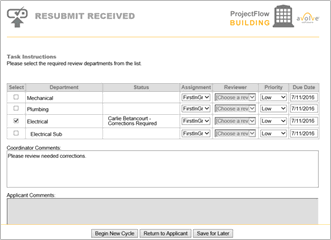
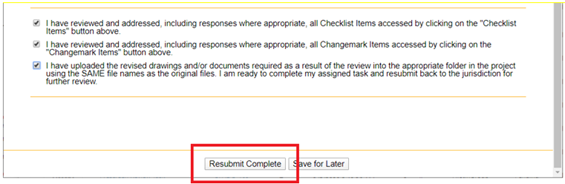
Provide a raw HTML which will be visible on the eForm page. Resubmit Received
– This
formlet is used to review items that have been sent back to other groups
and approve them or reject them and send them back for further corrections. Resubmission
for Non-Approved Reviews Only: Determines the default selected
review groups for the resubmission. Convert
FirstInGroup to Individual Assignment: Determines whether review
tasks are automatically converted
from FirstInGroup task assignment to Individual task assignment for the
Resubmit Received step in the workflow. Show All ReviewGroups: Determines
if all review groups will be shown in the list of available groups or
just the first level groups from the review configuration. If a department reviewer is
found to have made a mistake by the person performing this task,
a button will appear that assigns corrections to the needed party. If an applicant is found to
require corrections to their submissions during a department review,
a button will appear to assign a task for the applicant to make
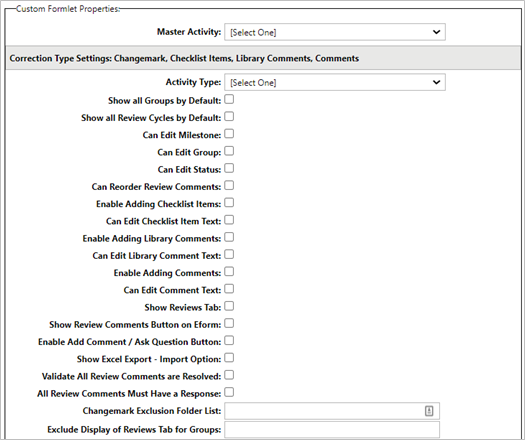
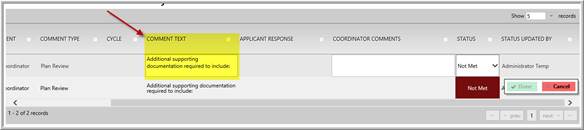
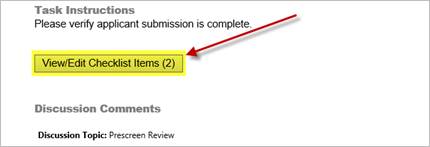
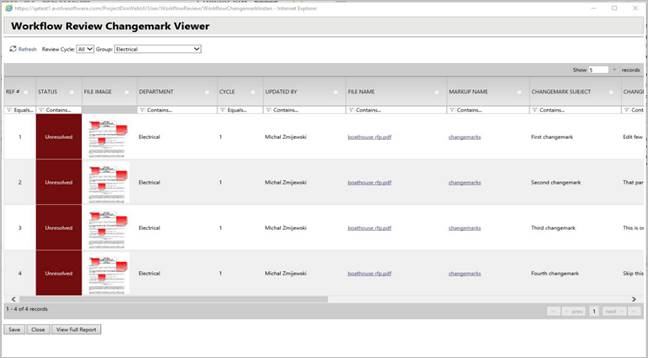
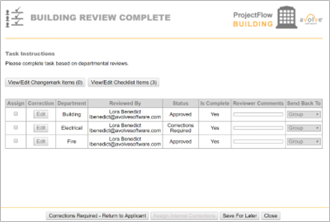
the needed adjustments. Review Comments -
Used
to add the View/Edit Changemark Items and View/Edit Checklist Items to
a designated step in the workflow.
If the changemark items are
not in approved status it should prompt the user with: "To complete
this task all changemarks must be in a completed status." If the property "ValidateAllChangemarkItemsMet"
is checked, then it would require that all changemark items have an approved
status before the formlet can be completed. User cannot approve any activity
that has the ChangemarkChecklistInforFormlet.ascx formlet if all changemark
items are not changed to an approved status. The activity can be rejected
but not completed. The Master Activity drop down displays a list
of other activities on the designer. The value that is
configured for this property is the main activity that any other ChangemarkChecklistInfoFormlet’s
are communicating with and linked to. Changemarks
and Checklists contain comments and discussions between two or more types
of users who are completing two or more different steps in the workflow,
sometimes a reviewer and applicant or coordinator and applicant, etc.
The activity chosen in the Master Activity drop down is a filter to ensure
only items created and linked to this master activity will be displayed
in the Checklist Viewer and Changemark Viewer. If Master Activity is not
selected, i.e. has value “Select One”, the viewer will show items created
for all activities with respect to other filters like group, review cycle.
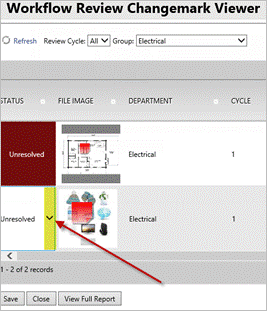
Workflow
Review Changemark Viewer Properties Show
Changemark Items for Current Group by Default: If “Show Items
for Current Group by Default” is checked [= TRUE], the Changemark Viewer
will set default Group filter to the current group for the current task
when the Changemark Viewer is opened. This is typically set to TRUE when ChangemarkChecklistInfoFormlet
is added to the Department Review activity. This will allow the
Changemark Viewer to automatically filter the Changemarks so the user
will see only those Changemarks in the current reviewer group. The user
can still change Group filter to another group or “All” groups. Can
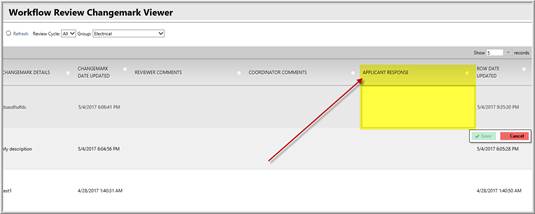
Edit Changemark Item Coordinator Comments:
If this configuration is checked [= TRUE], the user will be able to edit
the “Coordinator Comments” on the Changemark Viewer, otherwise it will
be disabled. Can Edit Changemark Item Reviewer
Comments: If this
configuration is checked [= TRUE], the user will be able to edit the “Reviewer
Comments” on the Changemark Viewer, otherwise it will be disabled. Can
Edit Changemark Item Groups: If this configuration is checked
[= TRUE], the user will be able to change the “Department” groups on the
Changemark Viewer, otherwise it will be disabled. The Department group
can only be changed if the Changemark is owned by the current user. The
groups can only be changed to a different group if the current user is
in the other group and the other group has a Changemark in the review
cycle for the Changemark that is being edited. Can
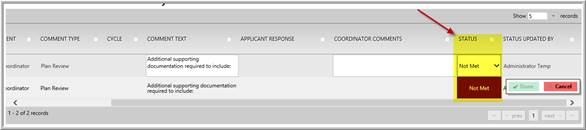
Edit Changemark Item Status: If this configuration is checked
[= TRUE], the user will be able to edit the “Status” on the Changemark
Viewer, otherwise it will be disabled. Can
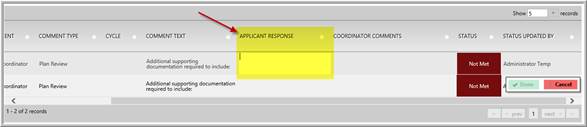
Edit Changemark Item Applicant Response: If this configuration
is checked [= TRUE], the user will be able to edit the “Applicant Response”
on the Changemark Viewer, otherwise it will be disabled. Show
All Changemark Items: If this configuration is checked [= TRUE],
the user will be able to see all Changemarks from all users and all groups
in all sub-workflows and review processes in the workflow. If this is
checked, it cancels the effect of selected Master Activity and does not
filter the Changemark Viewer Show
Changemark Item Button: If this configuration is checked [= TRUE],
the “View/Edit Changemark Items” will be displayed, otherwise it will
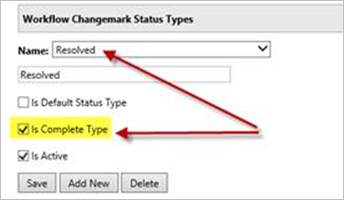
be hidden. Validate
All Changemark Items Met: All tasks for the activity where the
“Changemark Checklist Info” formlet is used cannot be completed until
all the Changemark statuses are resolved (i.e. of type “Is Complete Type”).
Changemark
Exclusion Folder List: The system
will not pull any of the changemarks into the corrections list for any
folder that is listed, and exclude from any of the reports. This allows
a customer to have a folder that is not exposed, through the use of permissions,
to an applicant and will keep the changemarks from showing up on the grid
as well. Workflow
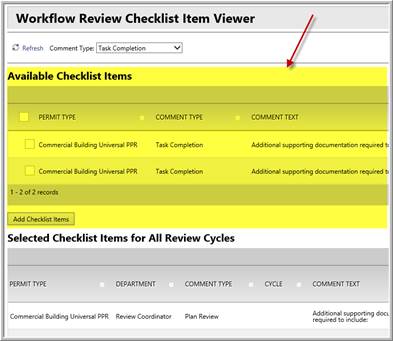
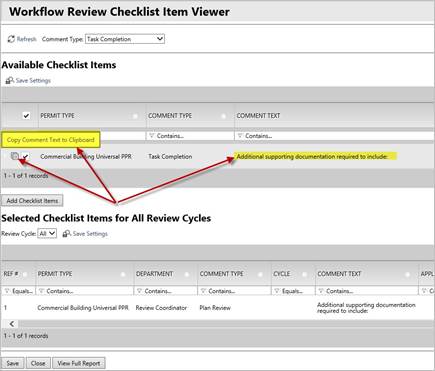
Review Checklist Item Viewer Properties Checklist
Categories Type: The ChangemarkChecklistInfoFormlet will contain
this new formlet property. This formlet property is an additional category
filter that will be used in the Checklist Viewer to ensure that only specific
checklist items show up when the user needs to add checklist items to
a checklist items conversation. This property will be a drop down populated
with the new Checklist Categories Type that will be used in the checklist
item conversation allowing the user to more easily view a smaller subset
of items to add. This will allow the user to quickly add the checklist
items needed for the workflow, so they can more quickly finish the task
of communicating the checklist items to the applicant. By default, there
will be two Checklist Category Types for most workflows, PrescreenReview
and DepartmentReview. This Checklist Category Type is required and must
be set, or the Checklist Item Viewer will not populate the Comment Type
and therefore not display any available checklist items in the top list
on the page. If “Enable Adding Checklist Items”
is checked then the “Checklist Categories Type” also should be selected.
Otherwise user will see error message, when opening the viewer. If “Enable
Adding Checklist Items” is not checked, “Checklist Categories Type” may
have [Select One] value. Typically, the ChangemarkChecklistInfoFormlet
used in the Prescreen Review and Prescreen Corrections step will be configured
to use the PrescreenReview category and the ChangemarkChecklistInfoFormlet
formlet property used in the DepartmentReview step will be configured
to use the DepartmentReview category. This is to ensure that when the
Checklists Viewer is opened from the Department Review step that the user
will only see checklist items that pertain to the Department Review step.
This is configured by default, but can be changed. Can
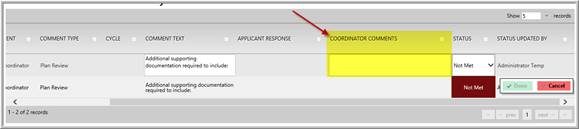
Edit Checklist Coordinator Comments:
If this configuration is checked [= TRUE], theuser will be able to change
“Coordinator Comments” on the Checklist Viewer. The user must click the
“Done” button to save the change. The user must also be a member of the
Coordinator Group to add or modify Coordinator Comments. Can
Edit Checklist Comment Text: If this configuration is checked
[= TRUE], if checked than user will be able to change “Comments Text”
on the Checklist Viewer. The user must click the “Done” button to save
the change. Can
Edit Checklist Status: If this configuration is checked [= TRUE],
if checked than user will be able to change “Status” on a Checklist viewer
page. The user must click the “Done” button to save the change. Can
Edit Checklist Applicant Response: If this configuration is checked
[= TRUE], the user will be able to change “Applicant Response” on a Checklist
viewer page. The user must click the “Done” button to save the change. Enable
Adding Checklist Items:
If this configuration is checked [= TRUE], theuser will see the list of
available checklist items and will be able to add items to the Selected
Checklist Items list. If this configuration is set to FALSE, user will
not be able to add checklist items. The property “Checklist Category Type”
should also be selected, otherwise user will see an error message. Show
Review Cycles: If this configuration is checked [= TRUE], the
button will be visible, otherwise it will be hidden. If the Review Cycle
button is hidden, the Selected Checklist Items list will show all checklist
items available in the entire workflow instance regardless of review cycle.
If the Review Cycle drop down is visible and there is active review cycle,
the Review Cycle drop down value will be set to that active review cycle. Show
All Checklist Items: If this configuration is checked [= TRUE],
the Selected Checklist Items list will show all checklist items essentially
cancelling the effects of Master Activity value. The Selected Checklist
Items list will show checklist items created in all steps of the workflow,
regardless of the Master Activity value. Show
Checklist Item Button: If the "Show All Checklist Items"
configuration is checked [= TRUE], all checklist items will be shown in
the Selected Checklist Items section of the Checklist Item Viewer regardless
of the Master Activity value. The Master Activity value is completely
ignored when the "Show All Checklist Items" configuration is
[= TRUE]. If the "Show All Checklist Items" configuration is
checked [= FALSE] and the Master Activity value is set, the Checklist
Item Viewer will show only checklist items created and linked to the master
activity. If the "Show All Checklist Items" configuration is
checked [= FALSE] and the Master Activity value is NOT set, the Checklist
Item Viewer will not show any checklist items because it’s not configured
to show all checklist items and it won't know which activity to use in
the query to get the checklist items. Show
Copy to Clipboard Button: Shows the Copy to Clipboard Button in
the Available Checklist Items section of the Workflow Review Checklist
Item Viewer allowing users to copy the comment text to the clipboard so
it can be pasted in other parts of the application if needed. Validate
All Checklist Items Met: All tasks for the activity where the
“Changemark Checklist Info” formlet is used cannot be completed until
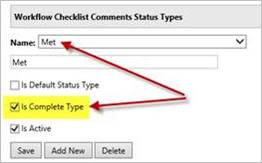
all the Checklist items statuses are met (i.e. of type “Is Complete Type”). Checklist
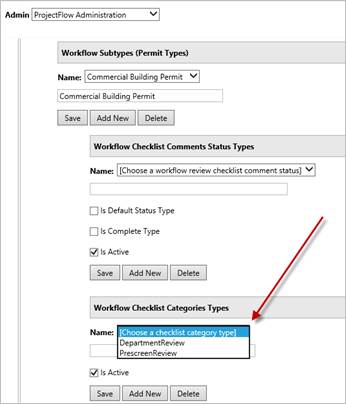
Category Types Checklist
Category types are created in the Workflow Types Manager as seen below. The user will have to first choose
a Permit Type before the Checklist Categories drop down will load. The
drop down will be disabled until a Permit Type is chosen. Checklist Category
Types can be configured differently for each permit type. The Checklist Categories Type can
only be deleted if it is not being used in any workflow designs or instances.
If it is being used, the Is Active checkbox must be unchecked and it will
no longer display in the user interface. The system will be able to report
on the conversations that happen during prescreen review or post review
using the Checklist Categories Type as a filter to the report. New
Reference Numbers for Checklists and Changemarks Each Changemark and each Checklist
item now has a unique reference number for the workflow instance. This
reference number will be used by the customer to identify each item when
discussing the checklists or changemarks with others. This reference number
will be the first column in the Checklists Viewer and Changemarks Viewer
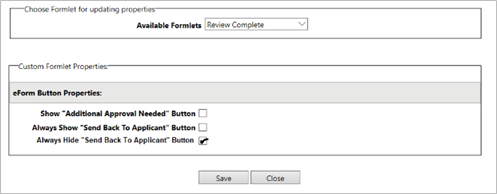
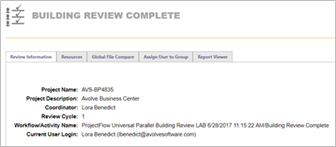
and the Checklist and Changemark reports. Review Complete–
Formlet
used to determine if the reviews have been satisfactorily completed and
sends the workflow to batch stamp (or next activity) or back to Applicant
Resubmit. Show
“Additional Approval Needed” Button: Determines whether to show
the Additional Approval Needed button Always
Show “Send Back to Applicant” Button: Determines whether to always
show the Corrections Required – Return to Applicant button or show the
button only when there are reviews that are not approved. Always
Hide “Send Back to Applicant” Button: If
option is checked then the "Correction Required - Return to Applicant"
button will always be hidden even when the reviews are in NOT in Approved
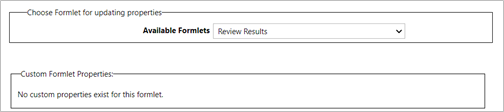
status. Review Results – The formlet that an applicant sees when
the Review Coordinator sends any submission corrections back to them after
the Department Review step. Any comments from the Review Coordinator will
be visible and a comment box available for the applicant to respond. Pressing the
Resubmit Complete button will do a check to see if the user has addressed
all the comments (provided a response) and if not, then prompt an error
when the user tries to complete the task. This formlet
property configuration allows the user to specify a project folder to
output a Review Comment Report. When this value is populated, a button
named "Generate Review Comment Report" will be displayed in
the formlet. When the button is clicked, a review commentreport will be
generated as a PDF and will be uploaded into the project folder specified
in the setting. This can be used for the Simple Batch Stamp and Scheduled
Batch Stamp activities. The format accepts a single level folder or multiple
levels: Approved Approved/Checklist For
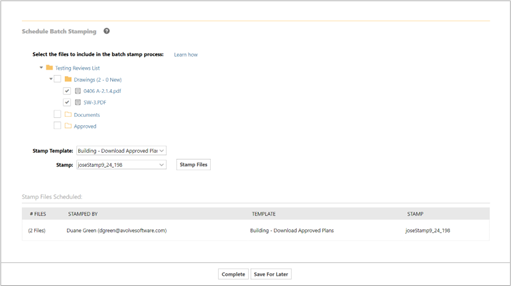
Manual activity, add the “Scheduled Batch Stamp” formlet into the activity
and specify a StartUp Task in the activity property. The
formlet allows the user to select the batch stamp template and the list
of files to batch stamp. Once this task is completed by the user, a scheduled
task gets created and the Task ID is placed into the “Scheduled Task ID”
activity property. The requesting user will get a notification once the
scheduled task iscomplete. For
the Automated activity property, the start-up task is not required, but
you do need to specify the activity properties and ensure you use the
Scheduled Batch Stamp formlet for the activity. The
Scheduled Batch Stamp activity is a batch stamp process that uses a scheduled
task in the ProjectDox Task Scheduler. Even though the “Scheduled Task
ID” is shown on the Properties page, it should not be modified, and it
is only shown for debugging and tracing purposes. If an error occurs when processing
the scheduled task, the workflow will be in error state and the error
log will be displayed on the workflow instance designer. This
drop down is a list of all the batch stamp templates configured in the
Admin section of ProjectDox. This
is a pipe-delimited list of folders to be stamped. Every document in each
folder will be stamped. Specify
a valid Group Name for the Project that will receive an email notification
when the automated batch stamp is completed or when errors occur. This
is used for debugging purposes and for technical support. It is a read-only
property and cannot be modified. When the task starts to run, the Scheduled
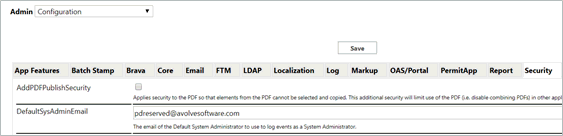
Task ID will be assigned. In ProjectDox, Admin, Configuration,
Batch Stamp tab specifies the number of files to be submitted in
a single batch in the first entry BatchStampFileCount. If your jurisdiction normally
stamps, 250 files for instance, this value can be 250 and the files will
be sent to publish immediately when the workflow engine runs. Customers that batch stamp 4000
files will want to test their system resources and determine the best
value. If the customer sets the value at 4000, the files will take priority
and all other uploaded files. The Applicant for instance, would have to
wait until the 4000 files complete, this is not best practice. The recommended
starting value is 50 to 250 in the BatchStampFileCount. PDReserved@<JurisdictionEmail>.com
is created during ProjectDox installation and used for the purpose of
running web services and identification in the ProjectDox log. PDReserved
email ensures that the user’s employment status or name change does not
impact automated processes. This user must remain active and have SA user
permissions. No user logs in with this email; it is only used to run web
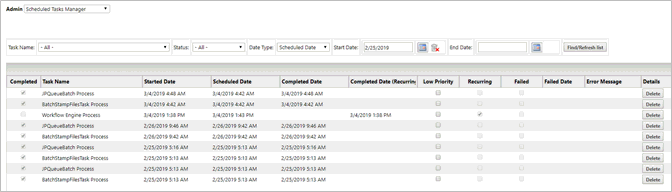
services and is written to the database log. Once
the activity is executed, a scheduled task gets created and the Task ID
is placed into the “Scheduled Task ID” activity property. The task will
begin publishing the BatchStampFileCount every 5 minutes. There are two
different tasks – the “Workflow Engine” task that runs the workflow engine
every few mins and the “Batch Stamp” task that processes a batch stamp. The
ProjectDox Utility web.config, configuration default is 300 seconds which
is equivalent to 5 minutes and the value can be edited, but no less than
three (3) minutes. <add
key="SecondsBetweenInvoke" value="300" /> <!--
how many seconds between when web services/processing are invoked, recommended
is 300 - 600 seconds (5 - 10 minutes) --> If the
batch stamp errors or the scheduled task times out, this will put the
ProjectFlow activity into an error state. The workflow recovery process
could consist of the following options: User
will see the error for the batch stamp activity in the designer as
the activity will be red and the error will list the files that were
published successfully and the ones that failed. User
will fix the error. User can go into the Approved
folder in ProjectDox and delete all the files then go back to ProjectFlow
and jump to clear the current Scheduled Task ID. This will reactivate
the batch stamp activity and allow the user to run the batch stamp
again. The
batch stamp scheduled task will notify the designated group when the batch
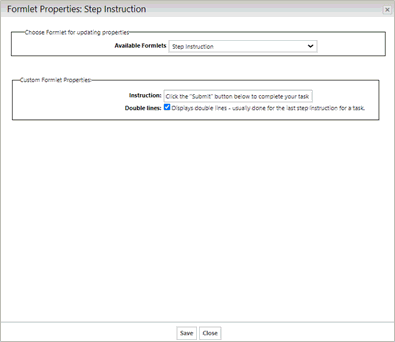
stamp process is complete and the activity is completed. Instruction:
The text that is displayed to the right of the “Step X of X:”. (required) Double Lines: If selected, the formlet will show a double line
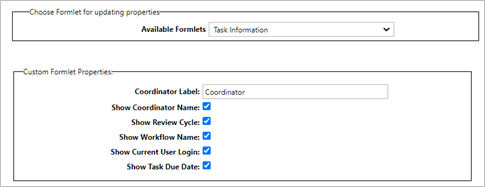
under the “Step X of X” title; otherwise it will be a single line. Formlet
User Interface Basic Layout: Coordinator
Label: Enter label
to be displayed next to coordinator name. Show
Coordinator Name: Select
radio box to display coordinator name. Show
Review Cycle: Select
radio box to display review cycle. Show
Workflow Name: Select
radio box to display workflow name. Show
Current User Login: Select
radio box to display current user login. Show
Task Due Date: Select
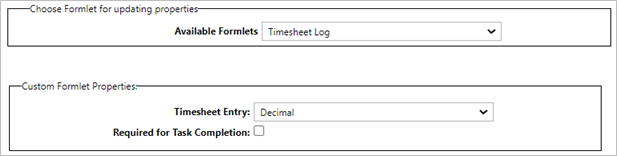
radio box to display task due date. Timesheet
Entry: Define the time parameters. Required
for Task Completion: Specify if a Timesheet Log entry is required
before allowing the task to be completed. When
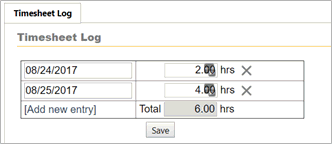
used, the Timesheet Log will most commonly be added to Department Review.
Once added, it can be configured to be require timesheet log entry for
the task or not depending upon the jurisdiction. The
eForm will display the fields allowing the reviewer to add as many entries
as needed, and automatically sum the total. Click “Add new entry”, choose
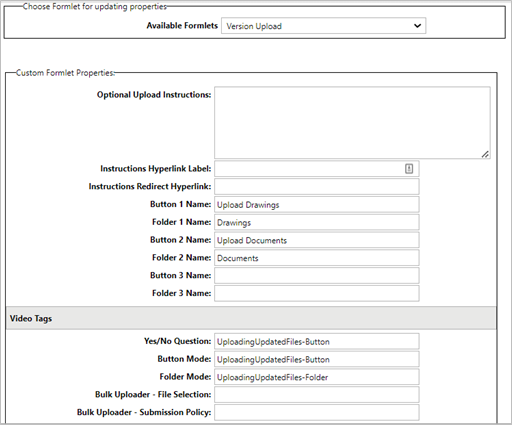
the date, add the hours, click Save. Optional Upload
Instructions:
Enter
the upload instructions for the
file upload formlet. Instructions
Hyperlink Label:
Text that can be configured as a hyperlink and displayed on the eForm. Instructions Redirect Hyperlink:
Hyperlink to a short tutorial
video to be played for the applicant on how to upload files. Button Name: Text
that will display on an upload button. Folder Name: Folder mapped to a specific project file folder.
This map is for a main or parent folder. Sub-folders are not supported. A
Version Upload Formlet will display the following in the eForm:
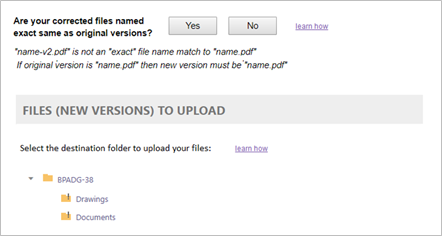
Clicking the Yes button will result in the formlet
opening up either the “Button” or “Folder” mode upload experience. Clicking
the “Upload Drawing” button will behave just as specified above in the
Upload File formlet. This will result in the bulk file upload window opening,
the folder receiving the files being displayed collapsed in the View Folders
section. Files uploaded in the bulk upload will go into this folder. This
folder will update after that showing the number of new files and a new
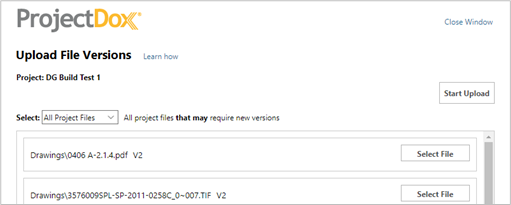
Folder icon state (if required). Clicking the No button
will result in a launch of a new window for one at a time mode with a
tab option to upload new files in addition to the new versions. If files
with markups exist (Changemarks on the Review Comments List), the “Select:
Files w/Markups” will display. If files with markups do not exist (No Unresolved
Changemarks on the Review Comments List), the “Select: All Project Files”
will display.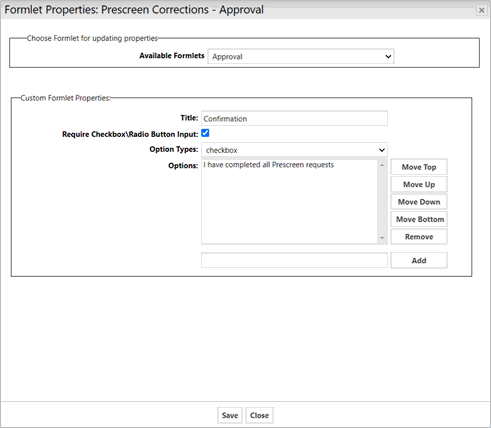

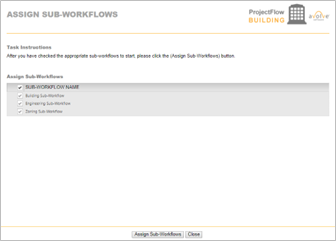
Assign Sub-Workflows Formlet:

The Topic title is the subject of the discussion. If no Topic title is
entered, an error message will display.
The Category drop down displays a list of other activities on the designer.
The value that is configured for this property is the main activity that
any other Discussion Board formlets are communicating with and linked
to. The Discussion Board
contains comments and discussions between
multiple groups and users across multiple steps in the workflow and each
one of those discussions must use the same master activity value.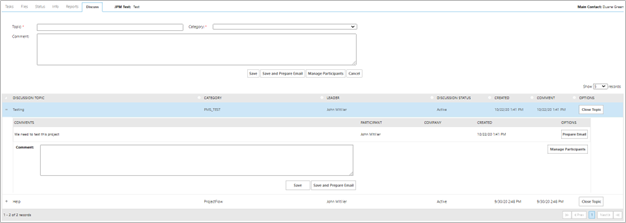


 Once
a user has participated in the review process, they cannot be deleted
from the group.
Once
a user has participated in the review process, they cannot be deleted
from the group.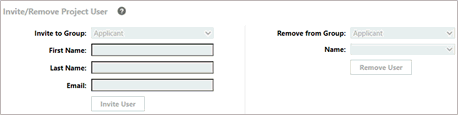
Set Sub-Workflow Status Activity


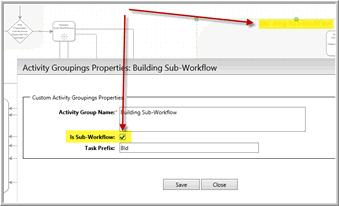
Sub-Workflow Status Types
There is a new workflow type called Sub-Workflow
Status Type. This status type is configured in the Workflow Types screen.
They are customizable and can be used anywhere in the workflow but they
are typically used within the Activity Grouping for a specific sub-workflow
although they can also be used outside of an Activity Grouping.


Scheduled Batch Stamp
- The Batch stamp activity allows the user
to manually or automatically batch stamp selected files/folders.The Scheduled
Batch Stamp activity is configured using a Scheduled Batch Stamp Activity
with or without a Scheduled Batch Stamp Formlet.
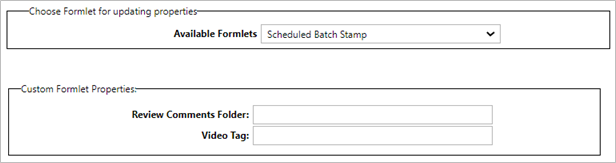
Formlet
Properties
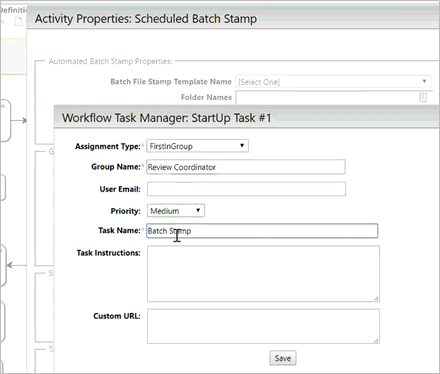
Activities Properties

Batch
File Stamp Template Name
Folder
Names
Notify
Group Name
Scheduled
Task ID

ProjectDox Core

Errors
Step Instructions-
This
formlet allows for a preformatted instruction title to be displayed on
the eform. This formlet can be placed multiple times on the eform so that
each section has its own “step” instruction. The steps will auto number
in the formlet.
Task Information -
This formlet allows for a user to determine
what is to be displayed on the beginning of the eform.
Timesheet Log -
Formlet that holds
the timesheet widget to allow a reviewer/user to track the amount of time
that they claim was spent on a task which could be different than the
calculated task time. At least one timesheet value must be entered before
completing the task. A validation message will display if the timesheet
entry value is left blank.
Version Upload
- The Version Upload screen allows
Applicants to resubmit their electronic plans and other documents during
the workflow process using the ProjectFlow eForms. This is deployed on
any new BIC workflows definitions; legacy workflows will continue to use
the Version Upload activity without the file upload formlet.
Version Upload allows for Optional Applicant
Instructions and hyperlink to redirect the applicant to additional information
a jurisdiction may wish an applicant to review prior to resubmitting their
drawings. They can add not only additional instructions, but they can
also add a hyperlink to redirect an applicant to additional information
on their website, etc. The hyperlink is optional, the user can just add
instructions or instructions and hyperlink.